After reading some blog posts, I decided to start my journey in home automation with something simple: monitor the temperature and humidity. As I didn’t want a huge DIY-project to begin with, I chose the Aeotec MultiSensor 6 with Home-Assistant.
My current setup at the time of writing.
- Raspberry Pi 3B+
- Home Assistant (version 0.84.6)
- Aeotec Z-Stick USB Gen 5
- Aeotec MultiSensor 6
The MultiSensor is using Z-Wave. No Wi-Fi. The Raspberry Pi can only detect Bluetooth or Wi-Fi devices. To use Z-Wave, you will need a custom Z-Wave gateway (in my case the Z-Stick USB key).
I will try to write more articles on this subject with my learnings. This first one is more for me to remember what I did well or wrong. But I guess it can be useful for someone else.
Aeotec MultiSensor 6
The MultiSensor can be powered with an USB cable or with batteries. The first thing to know is that batteries are NOT included with the device. You will need two CR123A batteries.
The device has 6 sensors.
- Motion
- Temperature (°C or °F depending on your region)
- Light (Lux)
- Humidity (%)
- Vibration
- Ultraviolet
The temperature sensor can mesure metrics from -10°C to ~50°C. For the ultraviolet, you will always see 0 if the device is not ouside, don’t worry.
Depending of the powering mode you choose, the device will not work the same way.
USB power supply
- Thresolds will be check every 10 seconds.
- The device can act as a Z-Wave repeater (in a mesh network).
- The device can receive update from the controller at any time.
Battery power supply
- Thresolds will be check when the device is waken up.
- The waken time cannot be lower than 240 seconds (your battery will not last long in this situation).
Raspberry Pi 3 B+
I’m using Hassbian for my setup. It is based on Raspbian. Home-Assistant is already configured in a dedicated Python virtualenv. The cool thing is that you have a direct SSH access to your machine (in comparison with Hass.io where you need an additional addon). The default username and password are the same as for Raspbian (pi/raspberry).
I’ve added an NGINX proxy in front of Home-Assistant to force HTTPS connections. I’ll explain my configuration in another post.
The other thing I did in addition was to disable the blinking on the stick with the following command.
$ echo -e -n "\x01\x08\x00\xF2\x51\x01\x00\x05\x01\x51" > /dev/serial/by-id/usb-0658_0200-if00
Home Assistant
The YAML configuration you need to add in your configuration.yaml file will look like the following.
zwave:
  usb_path: /dev/ttyACM0
  network_key: !secret zwave_network_key
  device_config: !include zwave_device_config.yaml
The network key is needed to unlock the full capabilities of your devices. You can generate a new key with the following command.
$ cat /dev/urandom | tr -dc '0-9A-F' | fold -w 32 | head -n 1 | sed -e 's/\(..\)/0x\1, /g' -e 's/, $//'
Backup this key. Without it, you’ll need to hard reset all your devices with a new setup.
The device_config file can host your custom configuration for your Z-Wave entities. I recommend using this file because by default Home-Assistant will write in this file all your updates from the UI.
Parameters
Parameters are store on the device itself. But it appears that they are lost when the batteries are removed. So be careful when you are switching batteries.
I found online several parameters to update on the device to work as expected. You can configure Z-Wave parameter directly from Home-Assistant in “Configuration > Z-Wave > Z-Wave Node Management”.
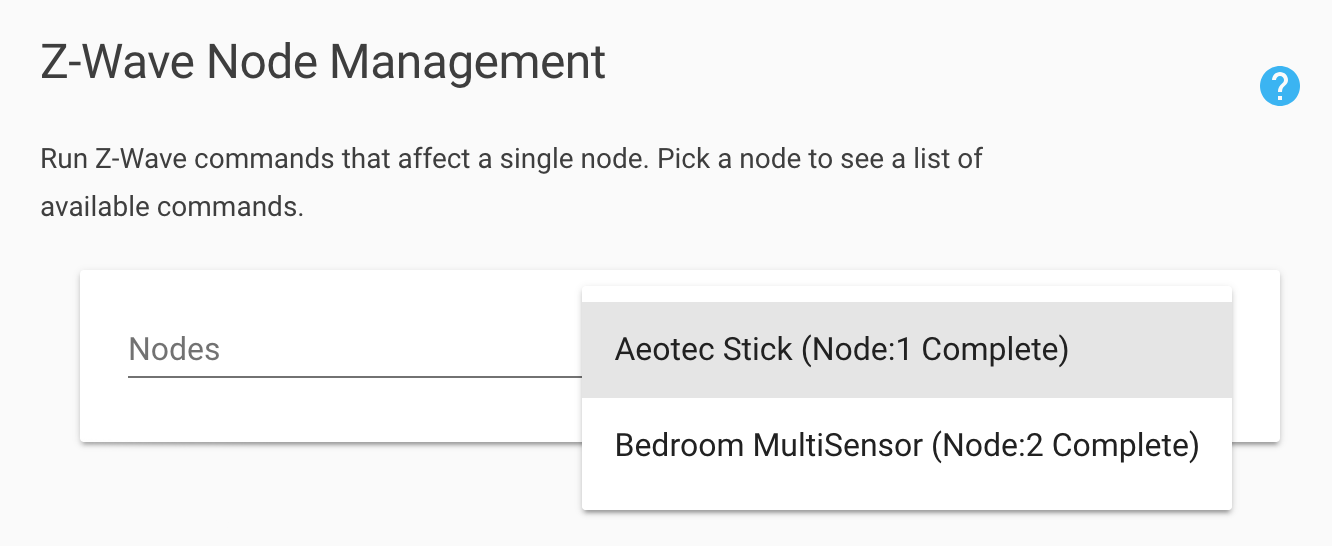
Select your node (in my case the second one) and after, go down to “Node config options” and edit the value for each parameter in the following table (they are not all required).
| ID | Parameter | Value | Description |
|---|---|---|---|
| # | Wake-up | 1800 | Waking up every 30 minutes to report data. |
| 3 | On Time | 10 | Duration that the motion sensor must observe no motion before it will return to the no-motion state. |
| 4 | Enable Motion Sensor | Enabled level 1 | The first level is working great for me. |
| 5 | Command Options | Binary Sensor Report | Without this parameter, the binary_sensor in Home-Assistant will not work (never updated). |
| 40 | Report Only On Thresholds | Enabled | When the group internal is reached with parameters 111-113 (and in taking into account also the waken time), the report will only be triggered if the thresold is reached. |
| 41 | Temperature Reporting Threshold | 655616 | For a threshold of 1°, the value will be 0x000A0100 (0x000A is equal to 10). You need to enter the base-10 value of the previous calculation 655616. The sensor seems to reject thresolds below 1°. |
| 42 | Humidity Reporting Threshold | 2 | Threshold change in humidity to induce an automatic report. |
| 43 | Luminance Reporting Threshold | 10 | Threshold change in luminance to induce an automatic report. |
| 101 | Group 1 Reports | 240 | Which reports need to send automatically in timing intervals for group 1 (10000000/128 - Luminance ; 01000000/64 - Humidity ; 00100000/32 - Temperature ; 00010000/16 - Ultraviolet; 00000001/1 - Battery; 11110001/241 - All ; 11110000/240 - All minus battery). |
| 102 | Group 2 Reports | 1 | Only the battery in this group. |
| 111 | Group 1 Interval | 1800 | On report sensor thresholds every 30 minutes. This value should not be lower than the waken time in battery mode (the device will be asleep otherwise). |
| 112 | Group 2 Interval | 28800 | Only report battery thresholds every 8 hours. |
Regarding parameter 41 (Temperature Reporting Threshold), this one is funny. The help message is not totally true because of firmware updates. If you read the specifications, you will see the following.
High byte is the threshold value. Low bytes represent the unit (
0x0100=Celsius,0x0200=Fahrenheit). The threshold value (high byte) contains one decimal point (if the value is set to 20 (0x00140100), the threshold value = 2.0°C or if the value is set to 20 (0x00140200), the threshold value = 2.0°F (US version). When the current temperature gap is more then 2.0, which will induce a temperature report to be sent out.